Progress on Debian Bugs
Peter Saisanas left an update on Debian's PowerPC mailing list reporting that a patch has been created to fix a bug that broke nouveau modesetting for Nvidia GPU users (bug applies to kernels > 3.18.16). The patch hasn't been made official yet, but you can view the original bug report here.
Clementine and xfburn had nasty PowerPC bugs, or perhaps just 32-bit bugs, that have now been fixed. The fixed xfburn is in Testing and the fixed Clementine as of now is in Sid. So if you haven't gotten Clementine to play files and wanted to enjoy its Spotify, Last.fm, or Soundcloud plugins, now's your chance.
In Iceweasel news, the bookmark folder bug and customization bug are fixed in version 41.0.1 in Experimental. So now Iceweasel appears back to its normal, healthy self.
Also, there's an r128 patch in this report that I haven't gotten around to testing. It fixes some breakage in the Stretch version of the driver, so Rage 128 users may want to check it out.
I suppose it wouldn't be a Debian bug reporting party if there weren't some unacknowledged bugs, and on the front I left two kernel bug reports (an appletouch trackpad bug and an Apple Motion Sensor bug). They haven't even been tagged, though the appletouch bug might have been fixed—I'm having trouble reproducing it. Possibly related: the appletouch trackpad driver performs much smoother with the latest kernel update in Sid.
Finally, if anyone wants to test the new pbbuttonsd in Experimental, see if you can duplicate this bug report. The suggested fix didn't work for me.
And if you want to literally shoot bugs, there's always MacBugs!
G5: Temperatures & Fan Speeds Part I
Hopefully most of you with G5 PowerMacs now have Debian up and running on your system and with little to no hassle. I would now like to take a few posts to cover the temperatures and fan speeds these machines should run at on average and under heavy load while also just covering general items relating to monitoring these items. This first post will cover just general agenda regarding the temperatures and fan speeds related to your G5. Follow up posts to this topic will be more in-depth.
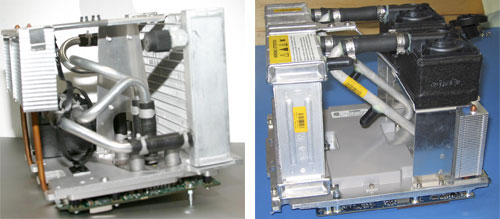
The G5's case itself is made of a anodized aluminum alloy that is combined with multiple system fans (most had up to 9!) and designated thermal zones to provide optimum cooling. Another thing to keep in mind regarding the cooling of these systems is that the different models had different means of cooling the system. Most G5 models simply used the traditional CPU heat sink method and built-in fans, such as the ones that you will see residing next to the CPU. Certain high end models used a liquid cooling system (LCS), which tended to be prone to coolant leaks. This led Apple to release models with a revised LCS to overcome the issues, but these can be harder to come by and seem to be few and far between. From what I have learned, only the 2.5 GHz Dual Processor (June 2004), 2.7 GHz Dual Processor, and Quad-Core G5 models had the LCS instead of the traditional CPU heat sink.
If you have a system temperature and fan speed utility installed within your OS X/Debian drive or partition, you will quickly learn that these G5 PowerMacs have quite a few hardware sensors built in you can use for monitoring which thrills me for a number of reasons. Temperature and fan RPM information can help you quickly spot current potential issues with certain devices in your system and help you pro-actively address and/or prevent possible issues down the road. Overall, they can help you increase the longevity of your G5 for years to come. Speaking of system maintenance, I would encourage all G5 owners to check out this post from Cameron Kaiser on the topic. Very detailed and insightful and I would say it applies in general for owners of other PPC machines as well in many regards.
Let us first review the safe operating ranges in terms of the general temperatures for our G5 PowerMacs as recommended and prescribed by Apple. Below are links to the technical specifications for each of the 5 generations of G5 PowerMacs released by Apple along with the safe operating temperatures for both storage (not system storage, but storage in terms of its external environment) and the system as a whole.
Original 2003 Series -
- Operating temperature: 50° to 95° F (10° to 35° C)
- Storage temperature: -40° to 116° F (-40° to 47° C)
June 2004 Series
- Operating temperature: 50° to 95° F (10° to 35° C)
- Storage temperature: -40° to 116° F (-40° to 47° C)
Late 2004 Series -
- Operating temperature: 50° to 95° F (10° to 35° C)
- Storage temperature: -40° to 116° F (-40° to 47° C)
Early 2005 Series -
- Operating temperature: Not available
- Storage temperature: Not available
Late 2005 Series -
- Operating temperature: 50° to 95° F (10° to 35° C)
- Storage temperature: -40° to 149° F (-40° to 65° C)
As you can see, the safe temperature ranges are quite similar across each generation. Not too much of a surprise there. If you take a look at each of those documents linked above, you will also notice safe humidity percentage ranges and I would encourage you to review those as well because where you store and run your G5 is also an important consideration to keep in mind. I myself keep my running in the basement where it is generally much cooler but also more damp, so I keep a small dehumidifier running during times of high humidity.
So with these numbers in mind and available for reference, let us discuss the different pieces of software we have at our disposal for monitoring the system's various temperature and fan sensor values under both OS X and Linux.
OS X
- Hardware Monitor (10.4 or Later) - Only gives temperature readings and still requires payment for full application access.
- Temperature Monitor - By the same authors as Hardware Monitor. Basically an older version of Hardware Monitor that is a free download.
- QuickFans - Another utility by the Cameron Kaiser for G5s, but may also work on G3 and G4 machines. However, this utility may or may work correctly though according to his notes, so use at your own risk.
- iStat Pro - Well known and heavily used widget that is my personal favorite and go to sensor monitoring application. Lightweight and available at the hit of a few buttons.
- XRG - Have not personally tried this one, but it looks quite interesting as it also includes GPU monitoring as well. Only available for OS X 10.5 in terms of PPC support.
- Conky - A utility many of us are probably familiar with. Incredibly powerful and adaptable. Requires a bit more legwork to start reading available sensors, but it is possible as I have wrote about here. I would recommend downloading the version available from the official Debian repositories. It does not actually have the native ability to obtain these values but gives you the tools to use other tools to output them. Makes sense right?
- lm-sensors - I cannot vouch for this either, but supposedly others have been able to make it work with different PPC machines in the past. I am willing to give it a shot myself. Their official site would not load, so I have linked to its Wikipedia page.
- sensors-applet - According to their page, "Gnome sensors applet is an applet for the gnome panel that displays readings from hardware sensors, including temperatures, fan speeds and voltage readings." I see it includes support for lm-sensors so should provide similar results. No experience with this one either.
So not a whole lot to choose from, but perhaps that is a good thing? Anyways, my next couple of posts will cover some of my own actual readings using some of the utilities mentioned in this post and how they compared with each other. If you are aware of other utilities and methods at our disposal for obtaining these values, please share as well and I will add them to the lists above.
What would be really sweet was if we could build our own custom utility for Linux for gathering this PPC sensor specific system information across the different models. Its certainly possible and I would be more than willing to help tackle it. Let me know your thoughts!
Other than, no update yet on the Nouveau driver situation for G5s, but my hope and willingness to resolve the issues are strong. I have actually started to write up another post on how to upgrade to Nouveau's latest drivers for testing purposes for when the time to test the fix does (and it will) come. It is not as straightforward as one would think.
Three years!
We turned 3 today, and more than a lot has happened here since I started this place back on August 11, 2012.
This blog has transitioned from a sole author (me) to currently having five authors in total, and is now transforming into a place where some of the the greatest minds in the PowerPC community are collaborating together.
I have really enjoyed sharing this place with others, and I can never thank all four of the other authors enough. Those four being Mark (fiftysixk), Dan, Brock (B-rock) and Herminio (rican-linux). You're all appreciated more than I could ever possibly convey.
Also, lets not forget Dr.Dave. He was with us for much of 2013, and most of his posts still exist here. Thanks again, Dave.
A big thanks to all the readers/followers of this blog for sticking around for these three years to read what we have to say.
Here is to another strong three years, and then another three after that, and so on...
G5: Simple Dual Monitor Setup
Since my last post dealt with graphics, I thought I would continue on that same subject although this time the topic should be a little more straightforward.
Before I start though, I would like to provide a quick update for Nvidia card users. As promised, I poked the Nouveau developers about the 64K page size issue by commenting on the existing bug that was filed a couple of years ago. I am happy to report that one of the developers has replied stating that he is planning to untangle the vm (virtual memory) mess in the coming weeks where he also plans to address the page size issue for 64-bit PPC machines. You can follow the bug here. Consider this another giant step forward for us G5 owners! I have offered to help in any way and have recently cloned the appropriate nouveau repositories to start parsing through the code myself and to install the latest version of the drivers for testing. I will keep you all updated.
Okay onto my regularly scheduled content. One of the many fantastic things about using a G5 PowerMac is that most of its supported graphics cards included dual head support of some kind. If you are one of the lucky to have two monitors to put to use, I would highly recommend it when using your G5 as the extra screen real estate definitely makes a difference. Not only that, the G5 has more than enough horsepower to drive both displays without eating up hardly any system resources. I myself have a flashed Nvidia FX4500 card with 512 MB of VRAM that includes two DVI heads. Along with that, I have two excellent 20" Apple Cinema Displays to plug into each head. These monitors support a maximum resolution of 1680x1050 and the results are magnificent.
Now that I at least have a working 2D accelerated desktop, I have managed to successfully get a dual monitor setup going as well as found a way to make the setup persistent across reboots. As we all know, there are many ways to accomplish a task in Linux and so with that in mind here is the simple setup I have configured to make this work on my G5.
The first thing you will want to do is install the graphical wrapper for xrandr called Arandr:
sudo apt-get install arandr
Once installed, you can find this utility under your Preferences menu. When opened, you will see square boxes for each of your detected displays as well as their identification names. For example, mine are called DVI-I-1 and DVI-I-2 as can be seen from the screenshot below. Your output IDs and rectangle sizes will vary depending on video card and monitors in use.

To configure your desired layout, simply drag each monitor to its desired position, which is likely how you have them setup on your desk/stand (i.e. to the left and right of each other, but again, your setup may differ). Once in place, simply click the green button with the arrow pointing to your right to apply the layout and put it to the test. Under the hood, this layout is actually a constructed xrandr command that gets called, but more on that in a minute.
If the results are satisfactory, you will want to save the setup by going to Layout -> Save As. The default directory to save it under is your .screenlayout folder in your home directory. I would recommend leaving it that location. The resulting file is actually a shell script, so the file extension should show .sh and if you view the permissions of the file it should be executable.
As mentioned above, the file only really contains the xrandr call that was constructed via your graphical layout you created. My particular layout ended up as follows:
xrandr --output DVI-I-1 --mode 1680x1050 --pos 1752x0 --rotate normal --output DVI-I-2 --mode 1680x1050 --pos 0x0 --rotate normal
Now that you have a shell script with the saved xrandr command that will create your desired dual monitor layout and configuration, you can apply it at any time by opening the shell script within Arandr and applying it or manually running the script within a terminal.
But wait? Why would you always wanting to be doing this manually? We have the power of automation at our fingertips. A good place to have this script run automatically at login is (you probably guessed it) your autostart file. For me, mine is located at ~/home/.config/lxsession/LXDE/autostart. I added the following line to the file and saved the changes:
/home/br0c0l1/.screenlayout/DualAppleCinemaDisplays.sh &
To test the changes out, simply restart your X display manager. For LXDE users, that can be done by restarting the lightdm service. Or better yet, just logout and back in. If all else fails, do a full reboot.
And so from now on, when you login to your G5 Linux install, you should automatically have your dual monitors configured in your desired layout. Enjoy the extra screen real estate!

If you run into any issues or have other ways of accomplishing this same task, feel free to leave a comment below.
New blogger guidelines for cookies in the EU
My blogger admin page provided me with the following message on new cookie regulations for the European Union and its member states:
European Union laws require you to give European Union visitors information about cookies used on your blog. In many cases, these laws also require you to obtain consent.
As a courtesy, we have added a notice on your blog to explain Google's use of certain Blogger and Google cookies, including use of Google Analytics and AdSense cookies.
You are responsible for confirming that this notice actually works for your blog and that it is displayed. If you employ other cookies, for example by adding third-party features, this notice may not work for you.
So as the administrator of this blog, I am responsible for making sure this notice is available to anyone from an EU nation. I have made more custom modifications to this blog than I can count, and there is a chance they could get in the way of this notice. If you live in the EU and do not see this notice; please contact me directly, or comment here, and I will correct it.
This blog doesn't use AdSense at all, so the only cookies are blogger stats and my third-party stats. I can assure you that both are perfectly harmless. The third-party stats I speak of is StatCounter, which are one of the most trusted and popular website/blog stat services on the net.
Update
Based on some testing I have done... the notice only shows itself once. I tried it with at least 5 EU nation codes, and once I clicked either "Learn More" or "Got It" it didn't show itself again. Even after a browser relaunch.
The MacMini G4 file server
I recently received a MacMini G4 and now to figure out what to do with it. I saw really cool video on how to use a macmini as a file server. In the video OS X was used but I wanted to do this on Linux. Two common ways to set up a file server are NFS and Samba.
This post will deal with setting up a file server using NFS on PowerPC.
Initial setup and network management
Besides the MacMini, I also got an external 1TB hard drive that I would be using as shared storage. I chose the 1TB drive mostly for testing. Right now it is fitting my needs, however in the future I do plan upgrading to a 4TB drive.
I installed Jessie on the mini with XFCE as the DE. I am going to run this headless, but I also wanted to be able to remote into the GUI. When I set my lxc containers I used vnc4server for remote access. Now I have found a better tool. Anyone who needs to have remote DE access to a server the tool I now recommend is xrdp. The is pretty easy, all you need to do is install the package,
apt-get install xrdp
The system takes care of the rest. Then all you need is an rdp client. The best one I have seen so far is remmina. Using it is pretty straight forward. The only gotcha I found was that you will need to define your screen resolution or it will not connect.
It is best if the macmini had a static ip in case dhcp give it a new address on reboot. So made a static reservation on my router.
NFS Install
Installing the NFS package is as simple as following,
apt-get install nfs-kernel-server
This will install package and needed dependencies. The system should start NFS upon install, but to verify this run these commands to see if you get the following results,
rican-linux@debian-minippc:~$ ps aux |grep smbd
root 8877 0.0 2.8 40012 14476 ? Ss Jul07 0:10 /usr/sbin/smbd -D
root 8878 0.0 1.5 40020 8028 ? S Jul07 0:01 /usr/sbin/smbd -D
root 15921 0.0 2.6 40332 13388 ? S 22:36 0:00 /usr/sbin/smbd -D
root 15922 0.0 2.6 40332 13388 ? S 22:36 0:00 /usr/sbin/smbd -D
root 15924 0.0 2.7 40484 14084 ? S 22:36 0:00 /usr/sbin/smbd -D
root 15926 0.0 2.6 40528 13768 ? S 22:36 0:00 /usr/sbin/smbd -D
rican-l+ 15949 0.0 0.4 4564 2072 pts/0 S+ 22:43 0:00 grep smbd
rican-linux@debian-minippc:~$ ps aux |grep nmbd
root 8899 0.0 1.0 25728 5432 ? Ss Jul07 0:03 /usr/sbin/nmbd -D
rican-l+ 15952 0.0 0.4 4564 2180 pts/0 S+ 22:43 0:00 grep nmbd
Once you have verified that NFS running, then you will need to edit the /etc/exports file in order to add the directories to share. You should have something like this below,
"/media/rican-linux/My Passport/" ip address(rw,sync,no_subtree_check,no_root_squash)
The first portion defines what directory you are sharing. Then you need define what machine you want to access your share. I have heard you can actually define by an entire subnet, but for some reason that did not work for me. So have a separate entry for each machine I want to access my share via NFS. The portion in parenthesis defines the permissions of the share. You can reference the exports man page for details. Then after you are done with the exports file, you need to reload it by running the following,
exportfs -ra
This should get you ready to set up the client side. This is done by installing the following package,
apt-get istall nfs-common
Once that is installed create a directory to serve as your mount point (I created one in my home directory for convenience). Then as root mount the drive,
mount ip address:path_to_drive mount_point
If successful you should see the following,
rican-linux@debian-ppc:~$ df -h
Filesystem Size Used Avail Use% Mounted on
/dev/sda3 71G 25G 43G 37% /
udev 10M 0 10M 0% /dev
tmpfs 404M 12M 393M 3% /run
tmpfs 1010M 72K 1010M 1% /dev/shm
tmpfs 5.0M 4.0K 5.0M 1% /run/lock
tmpfs 1010M 0 1010M 0% /sys/fs/cgroup
tmpfs 202M 8.0K 202M 1% /run/user/1000
ip address:/media/rican-linux/My Passport 932G 1.6G 930G 1% /home/rican-linux/macmini-ppc
If you wanted to make this permenant then update the fstab file. If you are wanting more information the Debian Wiki and the Linux Documentation Project sites are good resources to look at.
Subscribe to:
Posts (Atom)