The MacMini G4 file server


I recently received a MacMini G4 and now to figure out what to do with it. I saw really cool video on how to use a macmini as a file server. In the video OS X was used but I wanted to do this on Linux. Two common ways to set up a file server are NFS and Samba.

This post will deal with setting up a file server using NFS on PowerPC.


Initial setup and network management

Besides the MacMini, I also got an external 1TB hard drive that I would be using as shared storage. I chose the 1TB drive mostly for testing. Right now it is fitting my needs, however in the future I do plan upgrading to a 4TB drive.

I installed Jessie on the mini with XFCE as the DE. I am going to run this headless, but I also wanted to be able to remote into the GUI. When I set my lxc containers I used vnc4server for remote access. Now I have found a better tool. Anyone who needs to have remote DE access to a server the tool I now recommend is xrdp. The is pretty easy, all you need to do is install the package,
apt-get install xrdp

The system takes care of the rest. Then all you need is an rdp client. The best one I have seen so far is remmina. Using it is pretty straight forward. The only gotcha I found was that you will need to define your screen resolution or it will not connect.
It is best if the macmini had a static ip in case dhcp give it a new address on reboot. So made a static reservation on my router.


NFS Install

Installing the NFS package is as simple as following,
apt-get install nfs-kernel-server

This will install package and needed dependencies. The system should start NFS upon install, but to verify this run these commands to see if you get the following results,
rican-linux@debian-minippc:~$ ps aux |grep smbd
root 8877 0.0 2.8 40012 14476 ? Ss Jul07 0:10 /usr/sbin/smbd -D
root 8878 0.0 1.5 40020 8028 ? S Jul07 0:01 /usr/sbin/smbd -D
root 15921 0.0 2.6 40332 13388 ? S 22:36 0:00 /usr/sbin/smbd -D
root 15922 0.0 2.6 40332 13388 ? S 22:36 0:00 /usr/sbin/smbd -D
root 15924 0.0 2.7 40484 14084 ? S 22:36 0:00 /usr/sbin/smbd -D
root 15926 0.0 2.6 40528 13768 ? S 22:36 0:00 /usr/sbin/smbd -D
rican-l+ 15949 0.0 0.4 4564 2072 pts/0 S+ 22:43 0:00 grep smbd
rican-linux@debian-minippc:~$ ps aux |grep nmbd
root 8899 0.0 1.0 25728 5432 ? Ss Jul07 0:03 /usr/sbin/nmbd -D
rican-l+ 15952 0.0 0.4 4564 2180 pts/0 S+ 22:43 0:00 grep nmbd

Once you have verified that NFS running, then you will need to edit the /etc/exports file in order to add the directories to share. You should have something like this below,
"/media/rican-linux/My Passport/" ip address(rw,sync,no_subtree_check,no_root_squash)

The first portion defines what directory you are sharing. Then you need define what machine you want to access your share. I have heard you can actually define by an entire subnet, but for some reason that did not work for me. So have a separate entry for each machine I want to access my share via NFS. The portion in parenthesis defines the permissions of the share. You can reference the exports man page for details. Then after you are done with the exports file, you need to reload it by running the following,
exportfs -ra

This should get you ready to set up the client side. This is done by installing the following package,
apt-get istall nfs-common

Once that is installed create a directory to serve as your mount point (I created one in my home directory for convenience). Then as root mount the drive,
mount ip address:path_to_drive mount_point

If successful you should see the following,
rican-linux@debian-ppc:~$ df -h
Filesystem Size Used Avail Use% Mounted on
/dev/sda3 71G 25G 43G 37% /
udev 10M 0 10M 0% /dev
tmpfs 404M 12M 393M 3% /run
tmpfs 1010M 72K 1010M 1% /dev/shm
tmpfs 5.0M 4.0K 5.0M 1% /run/lock
tmpfs 1010M 0 1010M 0% /sys/fs/cgroup
tmpfs 202M 8.0K 202M 1% /run/user/1000
ip address:/media/rican-linux/My Passport 932G 1.6G 930G 1% /home/rican-linux/macmini-ppc

If you wanted to make this permenant then update the fstab file. If you are wanting more information the Debian Wiki and the Linux Documentation Project sites are good resources to look at.
G5: Nouveau & 2D Acceleration


DISCLAIMER: None of what you'll read below is of my own work, but mostly a summary on what I read about on the Debian PPC mailing list.

I have what I believe is somewhat exciting news for G5 owners in regards to using Nvidia cards and the open source nouveau driver, but more testing needs to be done!  What I'm about to explain and show should hopefully be able to allow you to at least achieve 2D acceleration.

However, before we become too excited, let us take a step back first and examine the situation with nouveau on G5 PowerMacs.  As of today (7/5/2015), I'm the only other known individual who has been able to make this fix work with the other individual being the one who filled us (the Debian PowerPC mailing list) in on how to get it working.  To be clear, I'm using Late 2005 PowerMac (Identifier 11,2) using a Quadro FX4500 Nvidia card.

As already known from my previous post on a fresh install of Jessie on a G5, I had to pass in an extra yaboot parameter (nouveau.noaccel=1) that would disable any acceleration with the Nvidia card using the nouveau driver. This would at least give us G5 owners with an Nvidia card a usable system, although all graphics rendering was happening on the CPU.  Not the most terrible thing in the world when using a dual-core G5, but definitely disappointing knowing how much power the graphics cards have to offer. 

Since the release of Jessie, there have been a handful of threads on the mailing list about issues other users were having when trying to use the nouveau driver.  Many people, myself included, recommended the yaboot parameter fix due to lack of expertise and knowledge of the nouveau driver, graphics programming, and troubleshooting.  Just this past week or so, another Debian user posted a thorough analysis on why the nouveau driver was having issues with the Debian 3.16.0-4 powerpc64 kernel and what could be done as a workaround to overcome the issues and at least achieve 2D acceleration. Notice that I said "workaround" and not "fix."

Basically, it came down to one or two different kernel configurations or both.

1) Right now, only a 4Kb pagesize configuration in the kernel will work with the 64-bit G5 kernel running the nouveau driver. The default pagesize of the included kernel-image (again 3.16.0-4-powerpc64 in Debian Jessie) is 64kb, which as mentioned by the poster improves performance of the driver, but again is not supported on G5 PowerMacs. To check the pagesize in use by your running kernel run the following command in a terminal:

getconf PAGESIZE

This will likely either return 4Kb or 65536Kb. 

2) The kernel configuration might also be set to have the nouveau driver use MSI interrupts.  As quoted by the poster regarding these interrupts:

The newer nouveau drivers in more recent kernels default to using MSI interrupts, however with the PPC G5, when using MSI interrupts, the powerpc FCODE rom on Nvidia cards does not correctly set up the MSI address (or vector).

To verify if you are using MSI interrupts or not, run the following command in a terminal:

cat /proc/interrupts

Look for the nouveau entry and confirm whether it is MSI or MPIC.

What the poster ended up doing was rebuilding a newer 3.18.16 kernel, disabling MSI interrupts as well as adjusting the pagesize in the kernel configuration to 4kb.  Not only that, but he has also posted a copy of this kernel image and headers for G5 owners to download and test on their G5 machines.

So this is a call to all other G5 owners running the latest Debian Jessie release and using an Nvidia graphics card.  Download and install the files linked above and post your results to the Debian PPC mailing list ASAP!  If need be, drop a comment with your results, and I will plug them into the aforementioned thread on the mailing list.  I would recommend downloading and installing this newer kernel image and headers on a brand new Jessie install if possible.

Remember to add in a new kernel configuration in your /etc/yaboot.conf file that links to the newly installed kernel and run sudo ybin -v to wrap it all up. From there, go ahead and reboot to the new kernel and test things out.

I can vouch that the above kernel does allow 2D acceleration now on my G5 PowerMac. Also, as I mentioned in the mailing list thread, I had to load the i2c-powermac module to stop the fans from sounding like a 747 ready for takeoff.  Now that I have 2D acceleration, I can now use xrandr and arandr to set my dual monitors up properly in an extended desktop setup that spans across both of them.  Now if we could only figure out how to achieve 3D hardware acceleration us G5 owners would be set for a little while longer.

Bug reports for these two problematic issues and configurations have been filed here and here.  From the sounds of it, you would not be able to make these two configuration changes work on G5 with the current Debian kernel 3.16.0-4 so do not pull out your hair trying.

I did some browsing around on the nouveau website and found that this G5 PPC pagesize issue is listed as a DRM to-do on this page.  My plan is to touch base with them about it again and see what, if anything, I can do to help. In the meantime, I've been reading up more and more on the nouveau driver and Linux graphics in general, so here is to hoping I'll be able to assist in some small way.  The developers of nouveau have some excellent documentation over at their site so I encourage you to check that out if you would like to also assist in any way.

Also, and lastly, it appears that 4.0+ kernels present all sorts of new issues with nouveau and G5s, but if nothing else, this small bit of information outlined above is hopefully a good sized step in the right direction!  We need to continue to do our duty of reporting any bugs we find regardless of whether anybody who currently is a developer wants to devote any time to them.  It helps just to have that information out there and available.

Best Under the Radar Linux Apps


Now that Jessie's dropped and PowerPC users are more or less working out the kinks, I thought it was time to share some of our favorite under the radar Linux apps that don't get the publicity they deserve. By "under the radar," I mean applications that generally don't get bundled with full desktop environments like Gnome or LXDE. So no VLC, no Evince, no Abiword, no default applications or anything like that. Instead, these are apps you had to hunt down yourself and were rewarded with unexpectedly great features and ease of use.

So here are a few of my favorites:

Qalculate! – This is a calculator app that's as comprehensive as I've seen. Currency exchange, functions of every kind, and graphing are among the many features.

Xournal – Seems to be primarily a handwriting app, but it also features simple PDF editing. This is great for filling out government forms where you only have to enter some text and a signature and you don't want to deal with LibreOffice.

Artha – An offline dictionary, you can also have it running in the background and call it up by highlighting a word and hitting a key-combo. Really comprehensive information, and did I say it was an offline dictionary

Shutter – Zen loves this and so do I. It's a screenshot plus markup utility and uploader. So it's a lot like Skitch.

LMMS – Linux Multimedia Studio, this is actually distributed with some audio production-centered distros, but in my opinion it should be distributed with every distro (like a Garageband for Linux). It's that good, and it's perhaps the best example of open source software, one that's intuitive and fun like classic Mac software used to be.

What are your favorite under the radar Linux apps?

Xorg bug lands in testing


One month and eight days, that is how long it took before an update to Stretch brought in a nasty bug. Here is a little background, back in the early part of the year a lot of people were excited about Ubuntu-MATE announcing plans to support PowerPC. The guys involved in the project did a great job with the distro. A lot of us were testing the 15.04 release while it was in beta. Then an upgrade in beta brought in a lot of trouble.

The main issue was the change to version 1.17 of Xorg. There is a bug in this release that serisouly distorts the colors and graphics of the DE in PowerPC. You can read about it here in the Ubuntu forums. So now it has reached Debian Stretch(testing). I have placed a bug report to Debain (#787965) and also notified the Debian PowerPC mailing list of the issue. The brightside is that it landed early so I am hoping this will give the developers plenty of time to work on it and find a solution.

I will keep you all updated.

UPDATE: It looks like the Xorg bug has been fixed! The latest version (1.17.2-1) has resolved the graphics issue. Good times are back again :) 

Jessie meets BigMac


UPDATE 7/5/2015 - I referenced the improper SMP kernel for G5 machines.  This has been corrected.

UPDATE 2 7/18/2015 - Added section for resolving high RPMs from the G5's fans.

As almost all of us know, Debian's latest stable release, Jessie, went live this past month.  I debated whether I would do an in place upgrade using apt-get or if I would just start from scratch with a fresh new install on my dual-core G5.  The latter option won for a couple of reasons, the biggest being that I wanted to see what worked and didn't work right out of the gate with this latest release.

The install was straightforward and almost identical to the installer for Wheezy with one major noticeable difference. The Jessie installer will give you the option to select your preferred desktop environment you would like installed. Of course, the ability to add in the necessary yaboot parameters for indicating your preferred desktop environment when running the installer have existed previously and still do, but it is a nice change for those not quite as technically minded.  Personally, I prefer LXDE, so I went with that.  If you like to live on the edge, go ahead and select more than one. Otherwise, everything else again, is almost identical.

One other thing to keep in mind if installing this on a G5 PowerMac is that you will want to make sure you are installing the 64-bit version of Jessie as well as installing the SMP (symmetric multi-processor) kernel so that it can take advantage of either your multiple CPUs or cores.  Just to put your mind at ease if you are still unsure, every model of G5 is 64-bit capable. Jessie would run on the non-SMP kernel, but only one core/CPU would be utilized. However, if you just load the installer up with the defaults you shouldn't really even need to worry about these two things.  If you've already installed Jessie and want to make sure you are running the system with both of these features run the following command:
uname -a

You should get something similar to the following with both SMP and ppc64 included in the results:
Linux BigMac 3.16.0-4-powerpc64 #1 SMP Debian 3.16.7-ckt9-3~deb8u1 (2015-04-24) ppc64 GNU/Linux

If for some reason, the SMP kernel was not installed, you can still install and enable it by installing the linux-image-3.16.0-4-powerpc-smp linux-image-3.16.0-4-powerpc64 package along with its headers and other dependencies.  You can substitute the appropriate image version for your system if different from what I have above.

While on the topic of installation, if you are new to Debian/Linux and/or Debian on PPC, I would encourage you to read through the install guide found here. I consider myself very well versed and experienced when it comes to working with Linux, but this guide taught me many things I previously did not know or never really fully understood.   The guide is available in several formats, so feel free to use your preferred choice. There are still many hyper-links I'd like to follow within that guide to further my knowledge and understanding of Debian/Linux and running it on the PPC architecture.

Once the install was complete, I rebooted to the login screen and was greeted with screwy looking and unusable results.  In regards to graphics, keep in mind that I have a flashed nVidia Quadro 4500 FX card so I'm free from the Radeon/KMS madness, but that's not to say noveau has several issues of its own. After just a tiny bit of reading on the PowerPCKnownIssues page, I learned I would likely have to disable hardware acceleration for things to work. By the way, I would definitely check out that page as well regardless as it covers many if not all issues affecting PowerPC users and most of it pertains to Debian installs as well.

So in my yaboot.conf I added the following line after the initrd line of my main Linux image and ran sudo ybin -v afterwards:
append="nouveau.noaccel=1"

I was then able to reboot in a working desktop environment. Despite the lack of 3D acceleration, the software rasterized graphics felt incredibly fluid (especially after installing and running compton) with still plenty of CPU cycles still leftover for a plethora of other tasks. Running glxgears givings me on average only about 116 FPS, which I know the nVidia card could crush if it could be put to use with 3D acceleration.

On the same graphics front, I have not yet been able to enable both of my 20" Apple Cinema displays so right now they are mirroring each other (the default behavior). I went ahead and installed arandr (a GUI-wrapper to xrandr) to try and enable both monitors, but each time I try to apply the changes after positioning the displays in the desired fashion, I'm logged out of my desktop session. So at this point, that aspect is still ongoing project.

Of course, I still had to install the necessary firmware for the G5's Airport card, but info on installing it can be found on the Ubuntu PowerPC FAQ page.  Another piece of hardware that was not working off the bat was sound, but running alsamixer and hitting the 'M' key to un-mute the Master Volume took care of that.  My 5 USB port Sonnet PCI card worked from the get go, but I have not yet tested connectivity with the Sonnet E4i card and G5 Jive, but will post results once I have done so.

Lastly, in regards to any issues up front with installation, a few have reported uncontrollable fans revving up to max RPMs.  If you happen to be one of these unlucky few, run the following command to load the necessary module that controls fan speed.

sudo modprobe i2c-powermac


If that resolves the issue, be sure to add these modules to /etc/modules so it is loaded at startup.

Other than that, I'm still in the process of customization, but for the most part have not ran into anything else unusual or come across any other unknown and unreported bugs.  Overall, apart from the no 3D acceleration, I'm quite impressed and look forward to using it daily on as one my main workhorses. In regards to graphics, I have not lost faith that some day in the future I will once again have 3D acceleration.  I was reading it possible get 3D acceleration back by compiling and installing an updated version of the nouveau driver.  I see that as quite a hill to climb, but at the same time I view this as another opportunity to learn and expand my knowledge of computing.  As has been said here and on many Linux forum posts all over the web, Linux is not for the faint of heart.

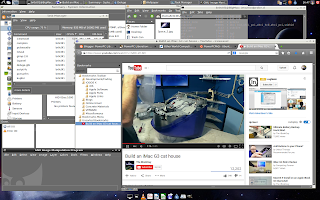
Here is a screen shot showing a few running applications. Notice the video I somehow randomly stumbled upon while putting together this post.


If you have a G5 you've recently installed Jessie on, feel free to share your experiences, bugs, or fixes in the comments below. If I discover anything else that could be useful or helpful when doing an install on a G5 I'll update this post unless the fix and/or info warrants an individual post.  Also, just know I'd be glad to help anybody who runs into any other issues with Jessie on their G5.

Oh Radeon..to patch or not to patch


As it has been well documented if you are using a radeon video card while running Linux on your PowerPC then you are in for a few hurdles. Things now are a lot more complicated with the changes from Wheezy to Jessie. In the past you really did not need KMS or accelerated hardware graphics to have a good, working, stable machine. Now with Jessie you at the least need KMS enabled if you want to have a usable desktop. If you are running a G4 following the boot parameters I laid out previously should get you going. However if you running a G3, Dan has a great walk through over here. Now that you have KMS enabled the next question is do you want accelerated graphics. It may not be important to most but there are some open source games in repositories that you can still play as long as you have 3D graphics enabled. You could set your default depth to 16 in xorg.conf, or you can install an already patched mesa package, or you could be more adventurous and try to patch the source and recompile yourself. I chose to patch and recompile the source. I wanted to see if I could do it and also I did not want to wait on others to produce a new patch version every time there is a new version on mesa. There are no plans to produce a final fix for this on PowerPC anytime soon. The current patch available is not suitable for final inclusion into upstream but it does get 3D working. So here is what you do.

First there are two resources you should read closely to understand patching and compiling deb build in Debian. The first is a great walk though on building packages which can be found in the Debian Forums. The second is a tutorial on apply patches in Linux, which can be found here. The next thing to obtain the patch files. These files can be found here. Jessie uses mesa version 10.3.2, which requires an additional patch to prevent the build from crashing during compile time. Now you will need to install the following packages that will allow you to compile into .deb packages:

sudo apt-get install build-essential fakeroot devscripts

The next step is to install the dependencies needed to build mesa and the source code of mesa itself. This is done by running the following commands (note from the install of the build dependencies till the time the .deb file are to be installed all the commands need to be done as regular user and not root):

sudo apt-get build-dep mesa
apt-get source mesa

Now to proceed to applying the patches. The patch file 08_packed_RGB_formats.diff patches the following, dri_drawable.c and dri2.c. You will need to be in the directory where the files to be patch are located. See below:

cd mesa-10.4.2/src/gallium/state_trackers/dri/
patch -p6 --dry-run < ~/Public/08_packed_RGB_formats.diff
checking file dri_drawable.c
checking file dri2.c
Hunk #1 succeeded at 163 (offset 34 lines).
Hunk #2 succeeded at 289 (offset -114 lines).
Hunk #3 succeeded at 699 (offset 150 lines).
Hunk #4 succeeded at 820 (offset 150 lines).


patch -p6 < ~/Public/08_packed_RGB_formats.diff
patching file dri_drawable.c
patching file dri2.c
Hunk #1 succeeded at 163 (offset 34 lines).
Hunk #2 succeeded at 289 (offset -114 lines).
Hunk #3 succeeded at 699 (offset 150 lines).
Hunk #4 succeeded at 820 (offset 150 lines).

The first time I ran the patch command I used the --dry-run option. This verifies the patch is good before actually applying it. This is a good habit to get into since messing up patch means deleting the source code and starting over. If you do not get the output shown above and instead are asked for the location of the file needing then patch, then this usually means you have the incorrect -p option. Please read the tutorial linked about for more detail on how to properly use it. The next patch file 09_r300g_big_endian_fixes.diff patches the following, r300_blit.c, r300_texture,c, r300_texture.h, r300_transfer.c, r300_context.h, r300_state.c, r300_state_dervied.c. This is how I applied this patch:

patch -p5 --dry-run < ~/Public/09_r300g_big_endian_fixes.diff
checking file r300_blit.c
checking file r300_context.h
checking file r300_state.c
Hunk #4 succeeded at 1659 (offset -7 lines).
Hunk #5 succeeded at 1675 (offset -7 lines).
checking file r300_state_derived.c
checking file r300_texture.c
checking file r300_texture.h
checking file r300_transfer.c


patch -p5 < ~/Public/09_r300g_big_endian_fixes.diff
patching file r300_blit.c
patching file r300_context.h
patching file r300_state.c
Hunk #4 succeeded at 1659 (offset -7 lines).
Hunk #5 succeeded at 1675 (offset -7 lines).
patching file r300_state_derived.c
patching file r300_texture.c
patching file r300_texture.h
patching file r300_transfer.c

If you are running Jessie then you are using mesa 10.3.2 with requires an additional patch to keep the compiler from crashing during build. Below are the commands:

cd mesa-10.3.2/src/mesa/main
patch -p4 --dry-run < ~/Public/dbc2d81d2ba12354876eb67c79e8a71e57e97f3c..cfeb394224f2daeb2139cf4ec489a4dd8297a44d.patch
patch -p4 < ~/Public/dbc2d81d2ba12354876eb67c79e8a71e57e97f3c..cfeb394224f2daeb2139cf4ec489a4dd8297a44d.patch

Now that the patches are applied the next was to change the version number of mesa to preserve the upgrade path. Since the current version of mesa for Stretch is 10.4.2-2, this how I changed it:

debchange -b -v 10.4.2-2a~patch1

The takes you to the changelog in a nano session. There edit the log if you want then save and exit. Now you are ready to compile your .deb packages! Just run the following:

dpkg-buildpackage -rfakeroot -us -uc

This will take a few hours to complete. So go have a drink and watch a movie while the packages are building. Then when it is completed you will see in the directory above all the .deb files. The build make the install, dev, and debug packages. I normal move them to a separate directory then segregate them into separate folders. So I then just install the packages like this:

sudo dpkg -i *.deb

Finally reboot and test! You should run the command LIBGL_DEBUG=verbose glxinfo |grep render and see this output "OpenGL renderer string: Gallium 0.4 on ATI RV350". If you do then congrats you just successfully installed a patch!

UPDATE I: It looks like starting with Mesa 10.5.5 the patches above are starting to fail. I am seeing this on Stretch. This should be expected since these patches are just really 'workarounds' and were never going to implemented upstream. You could still set the DefaultDisplay to 16 in xorg.conf to get 3D if you run into this.